If you've never invested in a foam roller, which is inexpensive and super-versatile piece of gym equipment that can help you with everything from working out the knots in your muscles to helping you build stronger core, then this is the time for you to get one.
Many gyms have foam rollers now - but only few know how to use it. You can even have your own foam roller at home if you don't want to share the sweat of other people sticking on foam rollers in the gym.
Foam rollers must be used correctly to release tension and tightness between muscles and the fascia - which surrounds the targeted muscles or group of muscles. Foam rolling can really improve your flexibility and range of movement and also it prevents the risk of injury.
The thing with foam rolling is you have to use your body weight, so if an area really hurts, you can go gentle on it first and support some of your weight by using and arm or leg. To those who have high pain tolerance, you can add more weight as the muscles relaxes. For short, you have to work to your own pain threshold.
If you're new to foam rolling, you can include this in your exercise routine every other day for a month. Then, if you can already manage you can do it once or twice daily - before and after workouts.
Things you need:
A space enough for you to do foam rolling (Carpeted and Taraflex flooring is better) and a foam roller. You can find and order them at MYOFIT.
Pre-workout:
Do a quick 5-minute warm-up before your workout routine or weight-training session.
How to properly do it?
For each move, slowly roll back and forth for about 20 to 30 seconds before moving to the next exercise. Hold for 5 to 10 seconds from end to end. Take deep and slow breaths to help your muscles relax. Make sure to avoid rolling onto your joints. The roller must be positioned under your muscles and if you hit a tight muscle, stay on that spot and apply direct pressure for 30 seconds until the pain decreases.
1.) Glutes
How?
Sit on the floor with your legs straight and extend your arms to lift your glutes. Move your glute back and forth across the roller. When you're done with one side, shift your weight on the other side and repeat.
2.) Hamstrings & Glutes
How?
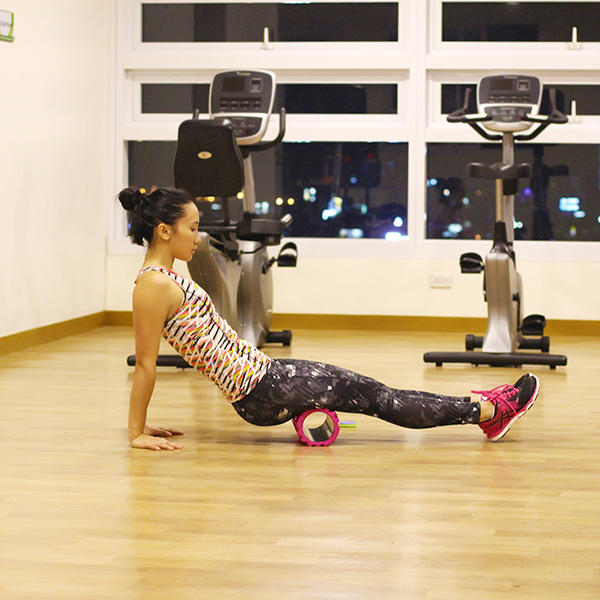
Sit with your legs extended in front of you. Position the roller under your thighs. Place your hands flat on the floor behind you for support. Roll using your arms to initiate the motion. Slowly roll back and forth to move the roller from the bottom of your glutes to just above your knees.
3.) Illiotibial Band (ITB)
How?
Position your left hip against the roller. Cross your right leg over your left as shown below the image and put both one or both hands on the ground for support. It's up to you. Roll using your left arm to assist the motion. Roll your ITB back and forth over the roller below your hip to above your knee. Switch on your right left after your done on the left leg.
4.) Calves - Soleus
How?
Sit on the floor with both legs in front of you. Place the roller underneath your calves and your hands on the floor behind you and use your hand to support and raise your butt off the floor. Roll slowly back and forth from just below your knees to above your ankles.
5.) Shins
How?
Get on your hands and knees on the floor. The foam roller must be placed underneath your shins while your hands should be positioned just in front of your shoulders on the ground, and your heels slightly outward. Roll by shifting your weight forward bringing your shoulders in front of your hands to move the roller from your ankles to just below your knees.
6.) Quadriceps
How?
Lie face down with the roller positioned directly under your thighs. Bend your elbows so that your forearms are flat on the floor to support your weight. Your feet should be raised as shown in the image below. Use your arms to gently roll your body forward and back from your pelvic bone to just above your knees.
7.) Latissimus Dorsi
How?
Lie on your right side with your right arm extended along the floor as shown in the image below. Place the roller directly under your right armpit. Roll up and down so the roller moves from your armpit to just above your waist. Switch position once you're finished on the left side.
8.) Upper Back (Thoracic Spine)
How?
Place your upper back against the roller position underneath your shoulder blades. Bend your knees 45 degrees so your feet are flat on the floor. Lift your butt and place both of your hands behind your head or you can also cross your arms over your chest. Slowly roll forward and back so the roller moves between the middle of your back and the top of your shoulder blades.
Does it hurt? I'd be lying if I said "No". But, the pain is for only a short term and then you'll have happier muscles and better recovery. "No pain, no gain"
Lastly, whenever you contract your muscles when you hold each position, you also strengthen each area as you stretch. Now, you have more reason to start doing foam rolling!
Follow me on Instagram: @GOHINGMELISSA Twitter: @GOHINGMELISSA
Check out my Youtube Channel: https://www.youtube.com/channel/UCcC_rwU4TQnPqkiPT_rtBdg
Til' my next post! <3


No comments:
Post a Comment