Showing posts with label Health & Fitness. Show all posts

Monday, March 28, 2016

Why do I always bring Hygienix Hand Spray with me Everyday?

Here's a little history when I started using HygienixAfter our volleyball game in UAAP back in college, my teammate's sister gave all of the players Hygienix alcohol hand spray. I wasn't really into using alcohol that time because I was a young athlete and I didn't care that much about hygiene but I kept it in my gym bag. Then I started using it after our game because usually our bus leaves right away so we didn't really have time to take a shower so I just used Hygienix hand spray and wiped off my sweat and changed into my extra clothes. 


Before using Hygienix, I usually get prickly heat rash or Millaria that develops in some people when they sweat more than usual like the case of athletes. Just imagine how athletes sweat during practices or games. Every person has thousands of sweat glands and if the sweat duct is blocked, the sweat seeps into nearby skin pores. This causes tiny pockets of swelling which cause the rash.


Glad I found a solution! Using Hygienix hand sprayhelps to keep the number of germs/bacteria on your skin down. This reduces the risk of developing prickly heat rash or Millaria. Germs/Bacteria can make you really sick. And, Athletes can't afford getting sick so we have to take care of our health everyday. I mean prevention is always better than cure.

Hygienix has an array of effective anti-bacterial products that you can bring anywhere anytime, to keep you germ-free anytime, anywhere. It kills 99.99% of germs, has a non-drying formula and lastly it has a unique cool scent. You really get that germ-free feel while smelling good.

I want to share that #FightWorldGermination was a success! We were able to defeat germs with the help of Hygienix. Watch this video:https://www.youtube.com/watch?v=8MDmGdl9MIQ


Follow me on Instagram: @GOHINGMELISSA Twitter: @GOHINGMELISSA

Check out my Youtube Channel: https://www.youtube.com/channel/UCcC_rwU4TQnPqkiPT_rtBdg


Til' my next post! <3

Monday, September 7, 2015

8 Foam Roller Exercises To Relieve Muscle Pain

If you've never invested in a foam roller, which is inexpensive and super-versatile piece of gym equipment that can help you with everything from working out the knots in your muscles to helping you build stronger core, then this is the time for you to get one.


Many gyms have foam rollers now - but only few know how to use it. You can even have your own foam roller at home if you don't want to share the sweat of other people sticking on foam rollers in the gym. 

Foam rollers must be used correctly to release tension and tightness between muscles and the fascia - which surrounds the targeted muscles or group of muscles. Foam rolling can really improve your flexibility and range of movement and also it prevents the risk of injury.

The thing with foam rolling is you have to use your body weight, so if an area really hurts, you can go gentle on it first and support some of your weight by using and arm or leg. To those who have high pain tolerance, you can add more weight as the muscles relaxes. For short, you have to work to your own pain threshold.

If you're new to foam rolling, you can include this in your exercise routine every other day for a month. Then, if you can already manage you can do it once or twice daily - before and after workouts.

Things you need:
A space enough for you to do foam rolling (Carpeted and Taraflex flooring is better) and a foam roller. You can find and order them at MYOFIT

Pre-workout:
Do a quick 5-minute warm-up before your workout routine or weight-training session. 

How to properly do it?
For each move, slowly roll back and forth for about 20 to 30 seconds before moving to the next exercise. Hold for 5 to 10 seconds from end to end. Take deep and slow breaths to help your muscles relax. Make sure to avoid rolling onto your joints. The roller must be positioned under your muscles and if you hit a tight muscle, stay on that spot and apply direct pressure for 30 seconds until the pain decreases.


1.) Glutes 

How?
Sit on the floor with your legs straight and extend your arms to lift your glutes. Move your glute back and forth across the roller. When you're done with one side, shift your weight on the other side and repeat.


2.) Hamstrings & Glutes

How?
Sit with your legs extended in front of you. Position the roller under your thighs. Place your hands flat on the floor behind you for support. Roll using your arms to initiate the motion. Slowly roll back and forth to move the roller from the bottom of your glutes to just above your knees.


3.) Illiotibial Band (ITB) 

How?
Position your left hip against the roller. Cross your right leg over your left as shown below the image and put both one or both hands on the ground for support. It's up to you. Roll using your left arm to assist the motion. Roll your ITB back and forth over the roller below your hip to above your knee. Switch on your right left after your done on the left leg.
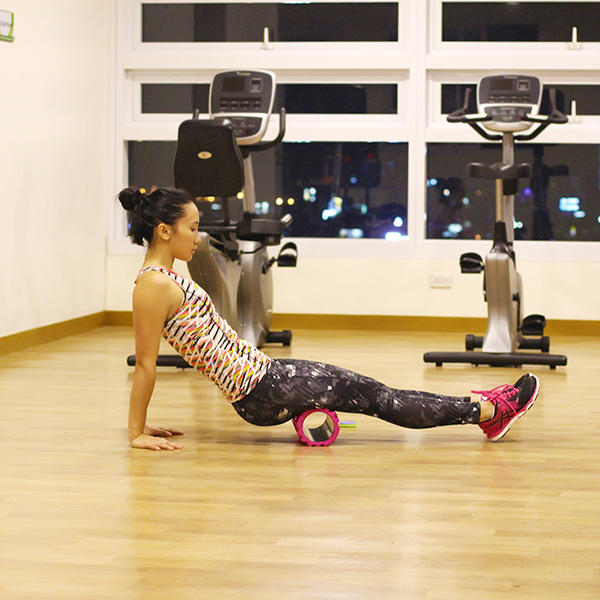


4.) Calves - Soleus

How?
Sit on the floor with both legs in front of you. Place the roller underneath your calves and your hands on the floor behind you and use your hand to support and raise your butt off the floor. Roll slowly back and forth from just below your knees to above your ankles.


5.) Shins

How?
Get on your hands and knees on the floor. The foam roller must be placed underneath your shins while your hands should be positioned just in front of your shoulders on the ground, and your heels slightly outward. Roll by shifting your weight forward bringing your shoulders in front of your hands to move the roller from your ankles to just below your knees.


6.) Quadriceps

How?
Lie face down with the roller positioned directly under your thighs. Bend your elbows so that your forearms are flat on the floor to support your weight. Your feet should be raised as shown in the image below. Use your arms to gently roll your body forward and back from your pelvic bone to just above your knees.


7.) Latissimus Dorsi 

How? 
Lie on your right side with your right arm extended along the floor as shown in the image below. Place the roller directly under your right armpit. Roll up and down so the roller moves from your armpit to just above your waist. Switch position once you're finished on the left side.


8.) Upper Back (Thoracic Spine)

How?
Place your upper back against the roller position underneath your shoulder blades. Bend your knees 45 degrees so your feet are flat on the floor. Lift your butt and place both of your hands behind your head or you can also cross your arms over your chest. Slowly roll forward and back so the roller moves between the middle of your back and the top of your shoulder blades.


Does it hurt? I'd be lying if I said "No". But, the pain is for only a short term and then you'll have happier muscles and better recovery. "No pain, no gain"

Lastly, whenever you contract your muscles when you hold each position, you also strengthen each area as you stretch. Now, you have more reason to start doing foam rolling!

Follow me on Instagram: @GOHINGMELISSA Twitter: @GOHINGMELISSA

Check out my Youtube Channel: https://www.youtube.com/channel/UCcC_rwU4TQnPqkiPT_rtBdg

Til' my next post! <3


Thursday, September 18, 2014

Shake Your Way To Fitness With Powerplate!

Hello everyone who is curious about Powerplate! I found this amazing fitness machine during my physical therapy in METAFACTOR WELLNESS. Since I could not run or lift weights because of my back injury, Powerplate saved the day. So, I thank Powerplate for my fast recovery also I did Hydro Threadmill or Underwater Threadmill. 

The idea behind the Powerplate machine is that exercises performed on the vibrating platform will be extra-effective. The vibrations activate reflexive contractions in the muscles and can ramp up your intensity quite effectively.

Would you believe that 10 minutes on the Powerplate is equal to 60 minutes of conventional training?

Powerplate might just be the best kept fitness secret in the present. Plus it is for people of all ages, conditions, and fitness levels because power plate exercises are low impact, which means they're easy on the joints but deceptively effective.

So are you ready to step up the plate? Try these simple stretches, back and lower body strengthening for accelerated muscle tone and calorie burn. Thank you PT Patrick and PT Charlotte for putting my recovery in the fast lane. :-D


PLEASE CLICK THIS LINK TO WATCH THE VIDEO: https://www.youtube.com/watch?v=JCoZuoZDQ5k


Follow me on Instagram: @GOHINGMELISSA Twitter: @GOHINGMELISSA

Check out my Youtube Channel: https://www.youtube.com/channel/UCcC_rwU4TQnPqkiPT_rtBdg

Til' my next post! <3


Wednesday, September 3, 2014

TRX: Beat Gravity

I want to say thank you to my little sister, PAULA GOHING who really helped me a lot to make the "MG Perspire to Inspire" happen. You earned a Korean Buffet treat for this. ;-P

Finally, I've been wanting to start my #GohingToBeFit videos on my blog. It's a big relief knowing that I'm cleared from my Orthopedic doctor after months under therapy. Metafactor Wellness Center really helped me put my recovery in a fast lane. Thank you Meta Body for designing this workout!

So first thing first, what are TRX bands? These babies are developed by a former US Navy SEAL named Randy Hetrick. He and his fellow SEALS looked for ways on how to stay in peak physical condition with limited access to training implements and/or space for soldiers, athletes, trainers and clients-indooors and out. You can perform hundreds of functional strength and core conditioning exercises to built strength, balance, core stability and flexibility all with just a single portable training station.

For Today's Workout:

TRX
Body Weight Pull-ups
Mountain Climbers
Squats
(See video below)


Many people struggle with this simple but efficient exercise. While that might be true, it shouldn't put you off getting started. Some say body weight exercises are way better than exercises with weights because the movements are very natural and you're much less likely to injure yourself.

Get ready to hang and start building muscles today!

Follow me on Instagram: @GOHINGMELISSA Twitter: @GOHINGMELISSA

Check out my Youtube Channel: https://www.youtube.com/channel/UCcC_rwU4TQnPqkiPT_rtBdg

Til' my next post! <3